Nine times out of ten, yellow pepper leaves starting at the bottom of the plant mean nitrogen deficiency or inconsistent watering, and the fix is either a dose of balanced fertilizer or a more disciplined watering schedule, not a mystery disease. Peppers pull nitrogen from their oldest leaves first when they run short, so the lower leaves go pale and yellow while the top of the plant stays green and keeps growing.
But that is not the only cause, and it is not even always the right one. Overwatering causes the exact same bottom-up yellowing as underwatering, which is the mistake that trips up almost everyone who diagnoses this by feel alone. There is one detail on the plant, where the yellow starts and whether it comes with a pattern like veins staying green or spots forming, that tells you which of five or six causes you are actually dealing with.
Stick with this to the end and you will get a two-minute diagnosis checklist you can run right at the plant, plus an honest read on whether a yellowing pepper plant bounces back or whether you are better off starting over.
Most Likely Causes, In Order
1. Nitrogen deficiency
Confirm it: lower, older leaves turn uniformly pale yellow to yellow-green while new growth at the top stays a healthy dark green. No spots, no blotches, just an even fade. Plants in containers or in soil that has grown several crops without amendment are the usual suspects.
Fix it: feed with a balanced fertilizer (something like a 10-10-10 or a tomato and vegetable formula) at the label rate, or work in a nitrogen source like compost or fish emulsion. You should see improvement in new growth within one to two weeks, though the yellowed leaves themselves usually do not turn back green.
But nitrogen is not the only nutrient that shows up this way, and the next one fools people constantly.
2. Inconsistent watering, too much or too little
Confirm it: check the soil two inches down. If it is soggy and the pot or bed drains slowly, or if it is bone dry and pulling away from the container edge, water is your problem. Yellowing shows up on lower leaves first here too, sometimes with leaf drop and a slightly wilted, dull look even when the soil is wet.
Fix it: for overwatering, let the top two to three inches of soil dry between waterings and make sure containers have real drainage holes. For underwatering, water deeply and less often rather than a little every day, aiming for about one to two inches of water per week including rain.
If the soil test does not point to water either way, look up instead of down.
3. Magnesium or other micronutrient deficiency
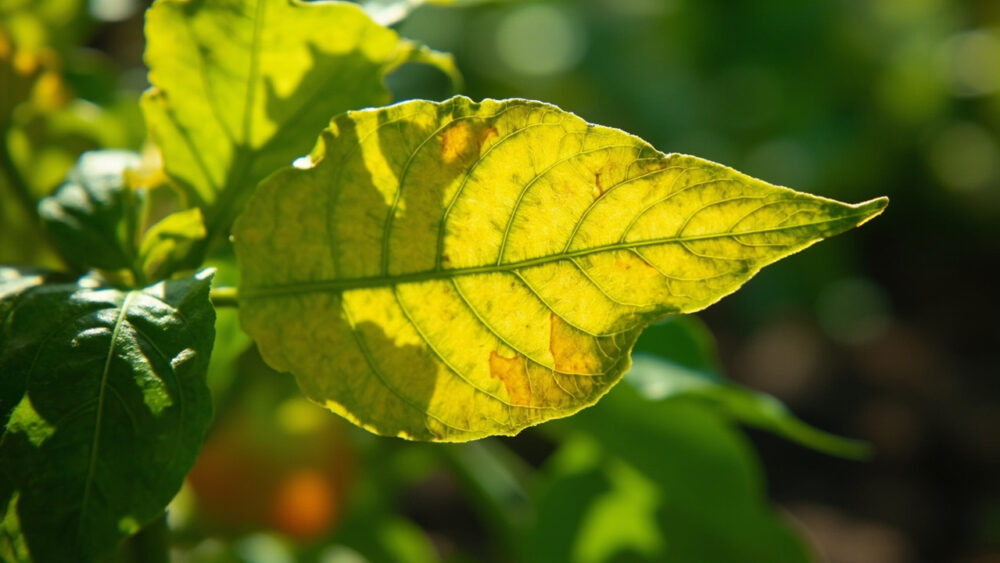
Confirm it: this is the one people mistake for nitrogen deficiency. The tell is interveinal chlorosis, yellowing between the veins while the veins themselves stay green, usually starting on older leaves and sometimes with a slight reddish or purple tinge at the edges.
Fix it: a light application of Epsom salt (magnesium sulfate) dissolved in water, roughly one tablespoon per gallon, applied to the soil every few weeks, usually corrects it. A balanced fertilizer with micronutrients prevents it from coming back.
Now for the cause that actually starts at the top of the plant instead of the bottom.
4. Root stress from transplant shock or compacted, poor soil
Confirm it: newer transplants, or plants in heavy clay or compacted container soil, show yellowing that can appear anywhere on the plant, often paired with stunted growth and a plant that just looks unhappy rather than thriving. Pull gently at the base; if the plant barely resists, roots may be struggling.
Fix it: loosen surrounding soil, mix in compost to improve structure and drainage, and avoid disturbing roots further. Give a transplant two to three weeks to settle before assuming anything else is wrong.
If the yellow leaves are also spotted or curling, you are looking at something else entirely.
5. Fungal or bacterial disease
Confirm it: yellowing paired with brown or dark spots, a mosaic-like mottling, curling, or a wilted look on one side of the plant points to disease rather than nutrition or water. Soilborne fungal issues often start with lower leaves yellowing and dropping in a ring pattern while the stem near the soil looks fine or slightly discolored.
Fix it: remove affected leaves and improve airflow by spacing plants and pruning lower foliage. If spots and yellowing keep spreading, a fungicide labeled for vegetable garden use can help; follow the product label exactly on timing and rate. Badly infected plants with widespread wilt and spotting often do not recover fully.
Before you commit to any of these fixes, run the comparison that actually separates them.
6. Natural aging of lowest leaves
Confirm it: if only the very bottom one or two leaves are yellowing on an otherwise vigorous, dark green, fruiting plant, this may just be normal senescence. Peppers shed their oldest leaves as they age and redirect energy to fruit.
Fix it: nothing needed. Pinch off the yellowed leaf and move on.
That is the full list, now here is how to tell them apart without guessing.
How to Tell the Causes Apart
Location matters most. Uniform yellowing that starts on the oldest, lowest leaves and moves up usually means nitrogen or water. Yellowing between green veins on older leaves means magnesium. Yellowing anywhere on the plant, new or old, paired with stunting, points to root stress. Spots or mottling anywhere mean disease, not nutrition.
- Old leaves, solid yellow, no spots: nitrogen deficiency.
- Old leaves, yellow between green veins: magnesium deficiency.
- Old leaves, yellow plus wilting, soil wet or dry: watering issue.
- Any leaves, yellow plus stunted growth, recent transplant: root stress.
- Any leaves, yellow plus spots or curling: disease.
- One or two bottom leaves only, rest of plant thriving: normal aging.
Once you know which one you have, the next question is whether the plant is actually going to make it.
Will It Recover?
Nutrient deficiencies have the best outlook. Fix nitrogen or magnesium and new growth comes in green within one to two weeks, though leaves already gone yellow generally stay that way and eventually drop. That is fine, the plant does not need them back.
Watering problems recover well once you correct the schedule, unless roots have been sitting in standing water long enough to rot. Mushy, dark roots at the base mean the damage is done and the plant likely will not recover.
Root stress and transplant shock usually resolve on their own within a few weeks of settling in. If a transplant is still declining after a month with no new growth, cut your losses and start a new plant while there is still season left.
Disease is the honest bad news category. Mild fungal issues caught early often stabilize with pruning and better airflow. Widespread spotting, wilting, or mosaic patterns rarely reverse, and a badly diseased plant is often better pulled to protect the rest of your garden.
Whatever the cause, the real win is not letting it happen again.
How to Keep It From Happening Again
Feed on a schedule, not just when you notice trouble. A balanced fertilizer every three to four weeks through the growing season keeps nitrogen and micronutrients from running out quietly.
Water deeply and consistently rather than a splash daily. Mulch around the base to even out soil moisture between waterings, especially in containers, which dry out far faster than garden beds.
Give roots room and good drainage. Amend heavy soil with compost before planting, and make sure every container has real drainage holes, not just a few pinpricks.
Space plants for airflow, at least 18 to 24 inches apart, and avoid overhead watering late in the day, which is what lets fungal disease take hold in the first place.
Now run the checklist below at the plant and you will have your answer in two minutes.
Diagnosis Checklist
- Look at which leaves are yellow: if only the oldest, lowest leaves, continue, if scattered anywhere with stunting, suspect root stress.
- Check for spots or mottling on the yellow leaves: if present, treat as disease and skip nutrient fixes.
- Check the veins on a yellow leaf: if veins stay green while tissue between them yellows, suspect magnesium deficiency.
- If the leaf is solid yellow with no vein pattern, suspect nitrogen deficiency.
- Feel the soil two inches down: if soggy, suspect overwatering, if dry and pulling from the pot edge, suspect underwatering.
- Tug gently at the base of a recent transplant: if it resists well, root stress is less likely.
- Count how many leaves are affected: if only one or two at the very bottom on an otherwise green, thriving plant, treat as normal aging and do nothing.
- Match your findings to the fix above, apply it, then check for new green growth in seven to fourteen days.
Most yellow pepper leaves trace back to something fixable within a week or two of correcting it. Diagnose before you treat, and you will save the plant instead of guessing it back to health.