The core of growing bearded irises comes down to three things: plant the rhizome shallow with the top exposed to sun, give it at least six hours of direct light, and resist the urge to water or feed it like a normal perennial. Get those right and you get a plant that blooms for decades with almost no fuss. Get the planting depth wrong, and that’s the single most common way people learning how to grow bearded irises kill a rhizome before it ever blooms.
There’s a second mistake almost as common: feeding irises like tomatoes. Too much nitrogen and lush foliage grows at the expense of flowers, and it invites the one disease that ends an iris bed for good. There’s also a sign everyone misreads in early spring, fan tips that look shriveled or soft, and whether that means the plant is dead or just fine depends on one simple check most people never do.
Stick with me through planting, feeding, and the problems that actually take irises down, and at the bottom you’ll find a save-able “Bearded Irises at a Glance” card with the numbers you’ll want on hand this weekend.
When to Plant Bearded Irises
The best planting window is mid to late summer, roughly six to eight weeks after bloom, when soil temperatures have cooled from their peak but the ground is still warm enough for root growth, typically July through September depending on your zone. In colder regions (zone 5 and below), aim for the earlier end of that window so roots establish before the ground freezes. In warmer zones (7 and up), you have until early October.
Spring planting works too, but you’ll wait a full extra year for bloom in most cases.
That timing matters more than almost anything else in this guide, because irises planted too late into fall never get their roots down before frost, and a rootless rhizome is an easy target for rot over winter.
Next comes the spot they actually need, and this is where a lot of otherwise careful gardeners get it wrong.
Choosing the Spot and Prepping the Soil
Bearded irises want full suna minimum of six hours, and ideally closer to eight. Shade doesn’t kill them outright, but it cuts bloom count hard and makes rot far more likely because foliage stays damp longer.
Soil matters just as much as light. These plants need sharp drainage. If you dig a hole, fill it with water, and it’s still standing after an hour, that spot will rot rhizomes no matter what else you do right.
Amend heavy clay with coarse sand or compost worked into the top 8 to 10 inches, and consider a raised bed or mounded row if your yard holds water after rain. Aim for a soil pH close to neutral, around 6.5 to 7.0. Skip heavy manure or high-nitrogen fertilizer at planting; it feeds rot organisms more than it feeds the plant.
Once the bed drains well and sits in full sun, you’re ready for the part everyone gets wrong: how deep to actually put the rhizome in the ground.
Planting Bearded Irises Step by Step
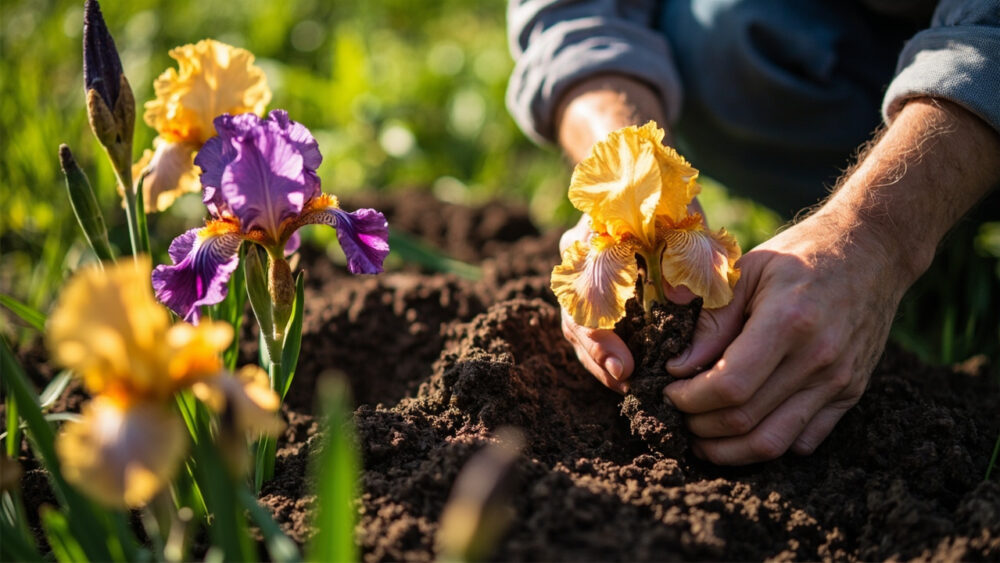
This is where most first attempts go sideways. Bearded irises are planted shallower than nearly every other bulb or rhizome a home gardener handles, and burying them like a dahlia or a canna is the single fastest way to lose them to rot.
1. Dig a shallow mound or trench
Build a low ridge of soil 3 to 4 inches high in the center of the planting hole, so the rhizome sits on top and roots drape down both sides.
2. Set the rhizome depth correctly
The top surface of the rhizome should sit at or just barely below soil levelwith the top visibly exposed to sun in most climates. In hot, dry southern zones, a very thin covering of soil, no more than half an inch, helps prevent sunscald. Deeper than that and it’s prone to rot; fully exposed with no soil contact at the roots and it won’t anchor.
3. Spread the roots and space rhizomes properly
Fan the roots down the sides of the mound and firm soil around them, leaving the top bare. Space rhizomes 12 to 18 inches apart, and point the leaf fan away from the center of the clump so new growth has room to spread outward.
4. Water in once, then back off
Give the new planting a thorough soak to settle soil around the roots. After that, hold off on regular watering until you see new growth, usually within two to three weeks.
That first watering is the last generous one you’ll give for a while, and the next section explains why irises actually prefer to be a little neglected.
Watering and Feeding Through the Season
Bearded irises are drought-tolerant once establishedand overwatering is a far bigger threat than underwatering. Water deeply but infrequently, about once a week during active growth in spring, and only during real dry spells in summer once the plant is dormant-ish after bloom.
If you assumed more water means more blooms, that guess is what fills an iris bed with soft, mushy rhizomes by midsummer. These plants evolved in lean, rocky soil and they bloom best when kept on the drier side.
Feed lightlyonce in early spring as growth resumes and again right after bloom, with a low-nitrogen fertilizer such as a bulb-type blend (something like 5-10-10). Skip nitrogen-heavy lawn or all-purpose fertilizer entirely. Too much nitrogen produces soft, oversized foliage and very few flowers, and it’s also the biggest single risk factor for the rot problem coming up next.
Get the water and feeding light-handed, and you’ve dodged most of what actually kills irises, but there’s still one disease and two pests worth knowing before they show up uninvited.
Problems That Actually Take Irises Down
Remember those shriveled-looking fan tips from the intro. Here’s the honest answer: in early spring, soft or slightly wrinkled leaf tips are often just winter dieback and completely normal. Squeeze the base of the rhizome near the soil line. If it’s firm, the plant is fine and will push new growth within a few weeks. If it’s soft, mushy, and foul-smelling, that’s bacterial soft rot, and it’s the real threat.
Bacterial soft rot
This is the disease that overwatering and over-fertilizing invite. The fix is surgicalnot chemical: dig up the affected rhizome, cut away all soft tissue with a clean knife until you reach firm white flesh, and let the cut piece dry in the sun for a day or two before replanting. Improve drainage in that spot before you put anything back.
Iris borer
Look for ragged notches in leaves in late spring and a hollowed-out, mushy rhizome by summer, often with soft rot following right behind. Clearing and destroying old foliage in fall removes the eggs before they overwinter, which is the most reliable non-chemical control. If infestations are heavy, an insecticide labeled for borers can help. Follow the product label exactly.
Leaf spot
Brown spots ringed with yellow on foliage are mostly cosmetic. Cut back and dispose of affected leaves in fall, and improve air circulation by dividing crowded clumps.
Handle rot fast and clean up foliage every fall, and you’ll rarely lose a rhizome to anything else, which brings us to the payoff this whole plant is grown for: the bloom itself.
When Bearded Irises Bloom, and How to Handle the Flowers
Bearded irises bloom in mid to late springtypically a single glorious flush lasting two to three weeks, though many modern reblooming varieties will flower again in late summer or fall if conditions stay favorable. There’s no harvest window to time here the way there is with vegetables. You’re watching for the flower stalks to send up buds, usually 12 to 30 inches tall depending on variety, about 10 to 12 months after planting a new rhizome.
Cut flowers for a vase just as the first bud on the stalk begins to open. The remaining buds will open in succession over several days indoors. Deadhead spent blooms on the plant to keep energy going into the rhizome instead of seed production, but leave the foliage standing until it yellows naturally in fall.
Divide clumps every three to four years, right in that same mid to late summer window you’d use for new planting, once you notice bloom count dropping or the center of the clump getting woody and bare. That decline is normal aging, not a problem to fix with fertilizer.
Everything above is the full story, but here’s the short version worth saving to your phone before you head out to the garden.
Bearded Irises at a Glance
- When to plant: mid to late summer, six to eight weeks after bloom, roughly July through September depending on zone.
- Sun and soil: full sun, six to eight hours minimum, sharp drainage, neutral pH around 6.5 to 7.0.
- Planting depth: rhizome top exposed at soil surface, never buried deep, spaced 12 to 18 inches apart.
- Watering: deep but infrequent, about once weekly in active growth, minimal once established and dormant.
- Feeding: low-nitrogen fertilizer in early spring and after bloom, skip high-nitrogen blends entirely.
- Main threats: bacterial soft rot from overwatering or overfeeding, iris borer, and leaf spot.
- Bloom time: mid to late spring, about 10 to 12 months after planting, divide clumps every three to four years.
If you remember one thing, remember the depth: exposed rhizome tops, dry feet, and lean feeding.
Everything else about bearded irises is just patience.