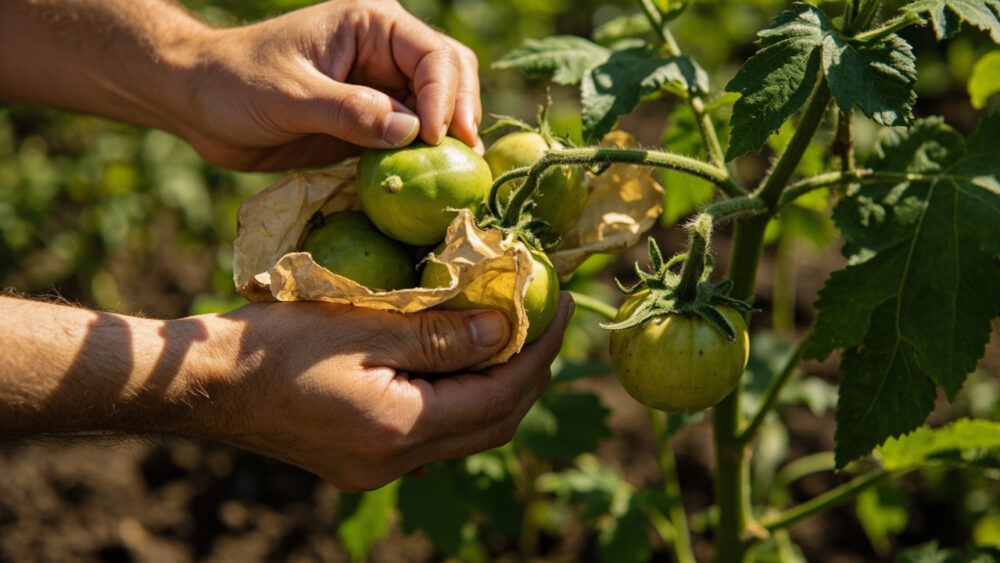
When to harvest tomatillos comes down to one visual cue: the papery husk fills out completely and starts splitting, and the fruit inside turns from hard and dark green to a lighter, slightly yellow-green with real give when you squeeze it. That usually happens 65 to 100 days after transplanting, depending on the variety, and it often shows up in flushes over several weeks, not all at once. Most home gardeners pick too early because a full husk looks done when the fruit inside is still tart, hard, and underripe.
That is the first mistake that costs people flavor. The second is assuming a fallen tomatillo means it is spoiled, when a drop to the ground is actually one of the plant’s clearest ripeness signals.
There is also a timing trap nobody warns you about: tomatillos need a second plant nearby to fruit well at all, and if yours never set much fruit, harvest timing is not your problem. Stick with this, because the save-able Tomatillos at a Glance card at the bottom covers spacing, timing, and storage in one place you can pull up from your phone while you’re standing at the plant.
The Husk Test: What Full and Split Actually Looks Like
A ready tomatillo fills its papery husk edge to edge, so the husk looks tight and slightly stretched instead of loose and baggy. As it ripens further, the husk dries out, turns tan or straw colored, and starts to crack open at the seams.
A husk that’s still green and loose means the fruit inside is small and not ready, even if it’s been on the plant for weeks. Give it more time rather than forcing it.
Once you see actual splitting, that fruit is worth checking by hand, not just by eye.
The Squeeze and Color Check
Pull back a cracked husk and look at the fruit itself. Underripe tomatillos are dark green, rock hard, and squeak slightly if you press them. Ripe ones have softened just a touch, shifted to a paler green or yellow-green tint, and give slightly under light pressure, similar to a ripe plum before it goes soft.
If you assumed color change to full yellow means ripe, that guess will leave fruit on the plant too long. Most cooking varieties are harvested green to pale green, still tart and firm, not yellow like a ripe tomato. A tomatillo that’s gone fully yellow or purple-tinged (in the purple varieties) has usually gone past its best cooking texture and turned sweeter and softer than most salsa recipes want.
Size matters less than people think. A tomatillo that’s husk-full at 1.5 inches across is just as ready as one at 2.5 inches. Variety controls the ceiling size, not ripeness.
Here’s the sign almost everyone misses entirely.
The Drop Test
Tomatillos are one of the few fruits where falling off the plant is a good sign, not a bad one. When a tomatillo is fully ripe, it often detaches from the stem on its own and drops to the ground, husk intact, fruit undamaged.
If you’re finding tomatillos on the soil under the plant and assuming they’re rejects, check them. Most are perfectly good, sometimes the best-tasting fruit on the whole plant, since the plant only releases them once they’re truly finished.
Don’t let a few days on the ground put you off either, as long as the husk is intact and the fruit isn’t soft, wet, or moldy it’s still good to use.
Now for the part that actually determines your harvest window.
The Timing Window: Early, On Time, and Too Late
Tomatillos ripen over an extended stretch, typically from mid-summer into the first light frosts, and a single healthy plant will hand you fruit in waves for eight to ten weeks once it gets going. That’s the honest answer to the question you’re probably about to ask: no, you don’t harvest the whole plant once and call it done, you’re picking every few days for the rest of the season.
Pick too early and you get hard, intensely sour fruit that cooks up tough and doesn’t break down well into sauce.
Pick too late, past full husk split with soft, yellowed fruit, and the tomatillo turns mild and slightly sweet instead of bright and tart, which changes your salsa verde more than most people expect.
Frost is the hard deadline. A light frost won’t kill mature fruit still on the plant, but a hard freeze will. If frost is forecast and you’ve got a plant loaded with full or splitting husks, that’s your cue to strip it, ready or not, rather than lose the batch.
Once you know what ready looks like, the actual picking is simple, but there’s a right way to do it.
How to Harvest Without Wrecking the Plant
Tomatillo stems are brittle where they meet the fruit, and yanking sideways snaps small side branches that would have produced more fruit later in the season.
- Hold the stem just above the fruit with one hand to steady the branch.
- Twist gently or snip with small scissors or pruners right at the point where the fruit stem meets the branch.
- Support the husk as you pull it free so it doesn’t tear if it’s already splitting.
- Check the ground under the plant every time you harvest and collect any dropped fruit.
Sprawling tomatillo plants benefit from a stake or cage, since heavy branches loaded with fruit will flop onto the soil and make both the husk test and the drop test harder to manage.
Once the fruit is in your hand, what you do in the next hour matters more than most people realize.
Right After Harvest: Husk On or Off?
Leave the husk on until you’re ready to cook or store, since it protects the fruit from bruising and slows moisture loss. Peeling immediately exposes the sticky, slightly resinous coating underneath, which is normal and washes off easily under running water right before use.
Sort as you go. Firm, husk-full fruit goes in one pile for fresh use within the week.
Anything soft, bruised, or with a torn husk should get used first or tossed, since damaged tomatillos don’t hold in storage.
Storage decisions now set how long this harvest actually lasts you.
Keeping the Harvest Going: Storage and Repeat Picking
Husk-on tomatillos keep in a paper bag or open container in the refrigerator for two to three weeks, sometimes longer if they were harvested slightly underripe. Don’t seal them in plastic, trapped moisture speeds rot.
For the long haul, tomatillos freeze well raw. Husk and rinse them, then freeze whole or roasted on a tray before bagging, no blanching required.
Regular picking is what keeps new fruit coming. A tomatillo plant that’s stripped of ripe fruit every few days keeps setting new flowers, while one left loaded with overripe, dropping fruit will slow down production as the plant shifts energy into the fruit already there.
If your plant barely fruited at all this season, the fix isn’t better harvest timing, it’s next year’s planting plan, which the card below covers.
Tomatillos at a Glance
- When to plant: transplant seedlings two to three weeks after your last frost, once soil has warmed to at least 60°F.
- Spacing and setup: space plants 24 to 36 inches apart and plant at least two, since tomatillos need cross-pollination from a second plant to set fruit reliably.
- Days to harvest: roughly 65 to 100 days from transplant, depending on variety, with fruit ripening in waves over 8 to 10 weeks.
- Ready signs: husk fills out completely and starts to split, fruit color lightens to pale green or yellow-green, and it gives slightly under gentle pressure.
- The drop test: tomatillos that fall to the ground on their own are usually fully ripe and still good to use if the husk is intact.
- Harvest method: twist or snip the stem right above the fruit rather than pulling sideways, to avoid snapping branches.
- Storage: keep husk-on in a paper bag in the fridge for two to three weeks, or husk, rinse, and freeze raw for months of storage.
Trust the husk and the squeeze together, not either one alone.
Pick often, and the plant will keep giving you more all season long.