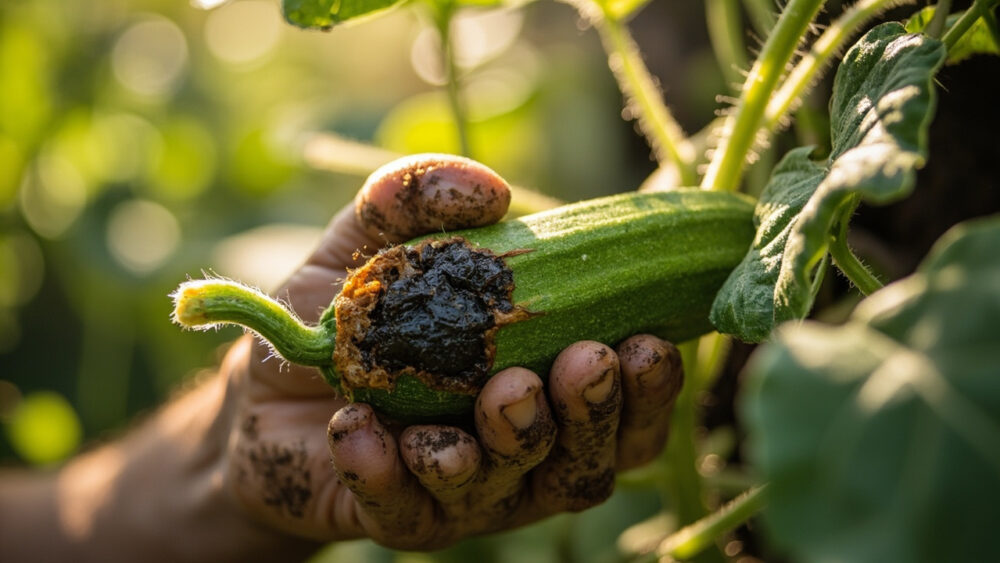
Zucchini blossom end rot is almost always a calcium delivery problem, not a calcium shortage in the soil, and the fix is inconsistent watering, not a calcium supplement. The blossom end of the fruit, the end where the flower was attached, turns brown, sunken, and leathery while the rest of the zucchini still looks fine. Get the water even and the next fruits usually come in clean.
Here is where most people go wrong. They see the brown spot, assume their soil is calcium-poor, and dump lime or a calcium spray on the plant. That almost never fixes it, because the calcium is usually already in the soil sitting there unused. The plant cannot move it to the fruit without steady water.
There are a few other culprits that mimic this exact symptom, and the fix is different for each one. One detail on the fruit itself tells you which cause you actually have. Stick around, the two-minute diagnosis checklist is at the very bottom so you can run it standing at the plant right now.
Causes, Most to Least Likely
1. Inconsistent Soil Moisture
Confirm it: press a finger into the soil near the root zone. If it swings between bone dry and soaked depending on the day, this is your cause. Zucchini in containers or sandy soil is especially prone to this swing.
Fix it by watering deeply, about 1 to 1.5 inches per week, on a consistent schedule rather than whenever you remember. Mulch 2 to 3 inches deep to buffer moisture swings between waterings.
Even out the water and you fix most of the problem before you even look at anything else.
2. Rapid Growth Outpacing Calcium Uptake
Confirm it: this shows up early in the season on the first few fruits, right when the plant is growing fastest and setting flowers hard. Older, established plants usually stop showing it once growth levels off.
There is no quick fix mid-crisis. Keep watering evenly and the plant typically catches up within two or three fruit cycles as its root system matures.
If the moisture is already steady and you’re still seeing it, the next cause is worth checking.
3. Root Damage From Cultivation
Confirm it: think back on the last two weeks. Did you hoe close to the plant, transplant it late, or have a dog dig near the base? Damaged roots cannot pull calcium efficiently even with perfect watering.
Fix it by backing off any tilling or hoeing within 12 inches of the stem and letting the roots regrow. A light mulch layer protects them going forward.
Roots heal slower than leaves, so patience matters more here than any product you could apply.
4. Excess Nitrogen Fertilizer
Confirm it: look at the plant overall. Is it dark green, sprawling, and leafy but setting fewer fruits than expected? Heavy nitrogen pushes leaf growth at the expense of calcium moving to fruit.
Stop feeding nitrogen-heavy fertilizer for the rest of the season. Switch to a balanced or lower-nitrogen feed if you fertilize again.
Too much of a good thing is still too much, and zucchini punishes it at the blossom end.
5. Low Soil pH Locking Up Calcium
Confirm it: a soil test is the only real confirmation here. If your soil tests below 6.0 pH, calcium becomes harder for roots to absorb even when it’s present.
Fix it by adding garden lime according to the test recommendation, worked into the top few inches. This is a slow fix, expect results next season more than this one.
This cause is rare compared to the first three, but worth ruling out if watering fixes nothing.
6. Genuinely Calcium-Poor Soil
Confirm it: another soil test call. True calcium deficiency in garden soil is uncommon, most native soils have plenty, but heavily leached sandy soil or a long history of no amendments can do it.
Fix it with gypsum or lime based on what the test actually shows, not a guess. Foliar calcium sprays are a weak, slow patch at best and not a real substitute for fixing the soil.
Now that you know the six suspects, here is how to tell them apart on the plant in front of you.
How to Tell the Causes Apart
Timing on the plant matters most. If it’s happening on the very first fruits of the season, think rapid growth outpacing the roots. If it starts mid-season on a previously healthy plant, look hard at watering consistency first.
Check where on the fruit it appears. Classic blossom end rot starts at the flower end and stays contained there, often circular. Rot that spreads unevenly across the whole fruit is more likely a secondary fungal issue moving into already-damaged tissue, not the original cause.
Look at the whole plant, not just the fruit. A sprawling, deep green, fruit-shy plant points to nitrogen excess. A plant that looks otherwise normal with just moisture swings points straight at watering.
Once you know which pattern you’re looking at, the next question is whether the plant can still come back from it.
Will It Recover?
The honest answer is yes, mostly, but not on the fruit already affected. Blossom end rot never reverses on a fruit that already has it. Pick off affected fruit so the plant stops wasting energy on it.
If the cause is watering inconsistency, expect clean fruit within one to two weeks of steady watering, since that’s roughly how long it takes new blossoms to develop and set fruit.
Root damage takes longer, often three to four weeks, since the plant has to regrow root mass before uptake improves.
pH and true calcium deficiency are the slowest to resolve and may not fully clear until next season after amendments have time to work into the soil.
Cut losses only if you’re seeing this on nearly every fruit for a full month despite consistent watering, at that point suspect a soil chemistry issue that needs a test rather than more waiting.
Prevention is genuinely the higher-leverage move here, so let’s get into what actually works.
How to Keep It From Happening Again
Consistent water beats everything else on this list combined. Deep, even watering on a set schedule, backed by mulch, prevents the vast majority of blossom end rot before it starts.
Water at the soil, not overhead, so you can actually judge how much the root zone is getting rather than guessing from wet leaves.
Test your soil every year or two rather than guessing at pH and calcium. It’s cheap insurance against chasing the wrong fix.
Go easy on nitrogen fertilizer once fruiting starts, and avoid cultivating deep near established plants.
None of this is complicated, it’s just consistency, which is exactly what most gardens are missing when this shows up.
Diagnosis Checklist
- Look at the fruit: confirm the brown, sunken spot starts at the blossom end, not the stem end or the sides.
- Check soil moisture now: press a finger in 2 inches, note if it’s dry, soaked, or evenly moist.
- Think back two weeks: has watering been irregular, feast or famine, or actually steady.
- Check the calendar: is this happening on the first fruits of the season or mid-season on an established plant.
- Inspect the base: any recent hoeing, tilling, transplant stress, or digging near the roots.
- Look at the whole plant: is it unusually leafy and dark green with few fruits, suggesting too much nitrogen.
- If watering and nitrogen both check out clean, pull a soil test for pH and calcium levels.
- Remove any fruit already showing rot so the plant redirects energy to new blossoms.
- Apply the matching fix from above and give it two to four weeks before judging results.
Run through that list once and you’ll know exactly which fix is yours, no guessing required.
Most zucchini plants fully recover within a few weeks once the water evens out.