Satin pothos root rot almost always comes from soil that stays wet too long, usually because the pot has no drainage hole, the mix is too dense, or the plant is getting watered on a schedule instead of by feel. The fix is to pull the plant, cut away every soft brown root, and repot into fresh, fast-draining mix in a pot that actually drains. Do that within a day or two of noticing the smell or the mush, and most satin pothos come back.
Here is the part almost nobody expects: the wilting that sends people running for the watering can is usually the plant telling you it already has too much water, not too little. That guess kills more satin pothos than drought ever does. There is also one detail on the plant right now, the smell and color of the roots when you tip it out of the pot, that tells you exactly how far this has gone and whether you are looking at a quick repot or a full teardown.
Stick with this to the end and you will get the two-minute diagnosis checklist, the same steps I run on my own plants before I decide whether to save them or start a new cutting.
What’s Actually Causing It, Most to Least Likely
1. No drainage hole or a cache pot trapping water
Confirm it: lift the nursery pot out of its decorative cover. If there is standing water in the bottom of that outer pot, you have found your answer immediately.
Satin pothos (Scindapsus pictus) is often sold in a plastic grower pot slipped inside a decorative pot with no hole. Water goes in, has nowhere to go, and the roots sit in it for days.
Fix it: drill or buy a pot with a real drainage hole, or always pour off excess water from the cache pot within 15 minutes of watering.
This one cause explains a huge share of the “I barely watered it” root rot cases.
2. Watering on a schedule instead of checking the soil
Confirm it: stick a finger 2 inches down. If it’s still cool and damp on day 3, 4, or 5 after watering and you’re already watering again anyway, this is your cause.
Satin pothos wants the top half of the pot to dry out between waterings. In low light or cool rooms that can take 10 to 14 days, not the weekly rinse many people default to.
Fix it: water only when that 2-inch check comes back dry, and let the pot’s weight (light when dry, heavy when wet) become your real guide instead of the calendar.
But even good watering habits fail if the pot underneath them is working against you.
3. Dense, water-holding potting mix
Confirm it: squeeze a handful of the mix. If it balls up like wet clay instead of falling apart loosely, it’s holding far more water than pothos roots can tolerate.
Straight bagged potting soil, especially older mix that’s compacted, drains slowly and stays soggy at the root ball’s core even when the surface looks dry.
Fix it: repot into a mix cut with perlite, orchid bark, or coarse sand, roughly one-third amendment to two-thirds potting soil, so water moves through instead of pooling.
The mix matters just as much as the watering can, and the next cause is the one people almost always misdiagnose.
4. Overwatering mistaken for underwatering (the wilting trap)
Confirm it: the leaves are drooping or curling, but the soil underneath is wet, not dry, when you check 2 inches down.
Rotted roots can’t move water up to the leaves even though there’s plenty in the pot. The plant wilts exactly like it’s thirsty, so people add more water and make it worse.
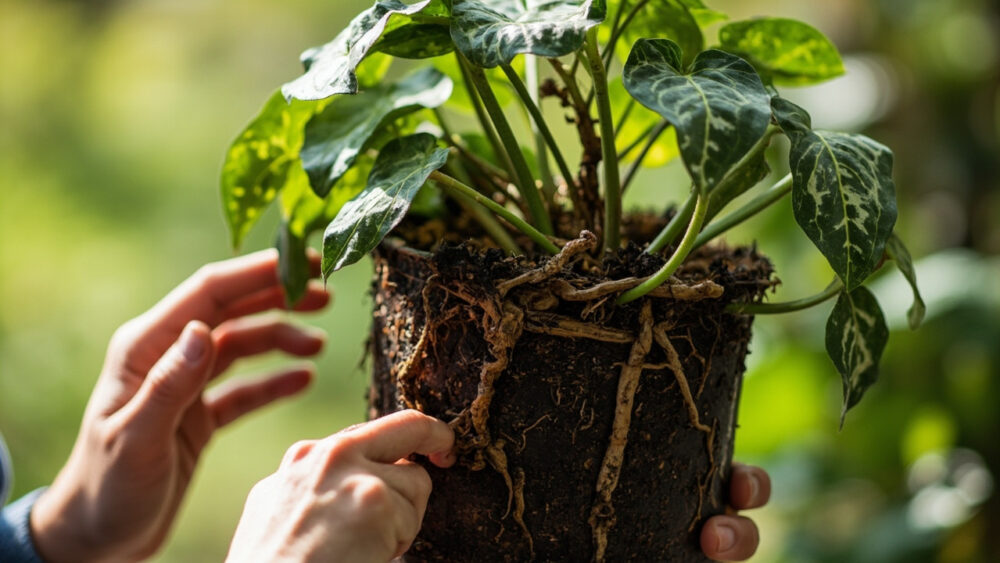
Fix it: stop watering immediately, unpot, and inspect the roots (see the section below on what healthy versus rotten roots look and smell like).
This is the trap most people fall into first, and it’s exactly why checking the roots beats guessing every time.
5. A pot that’s too large for the current root system
Confirm it: if you recently upgraded to a noticeably bigger pot and the trouble started within a few weeks, this is likely a contributor.
A big volume of mix around a small root ball stays wet far longer than the roots can use, even with good drainage.
Fix it: size pots up gradually, about 1 to 2 inches in diameter at a time, not by doubling the container.
Now that you know what causes it, the next question is which one you’re actually dealing with.
How to Tell the Causes Apart
Where the damage starts matters more than most people think. Root rot from soggy soil shows up first in older, lower leaves: yellowing, then brown mushy patches, then the leaf drops.
Fungal leaf spot or bacterial issues (less common but possible) tend to start as isolated brown or black spots with a yellow ring, often on younger leaves, not a whole-leaf yellow fade.
Underwatering causes crispy, dry, curling leaf edges with soil that’s bone dry and pulling away from the pot’s sides, the opposite feel of a rot problem.
If several lower leaves are yellow and mushy at the same time, and the soil feels wet, that pattern points straight at root rot rather than a leaf disease or drought stress.
Will It Recover?
If you catch it early, meaning some white or tan roots remain firm and only a portion are brown and soft, recovery odds are good. Trim the bad roots, repot fresh, and expect new growth within 3 to 6 weeks.
If most of the root mass is mushy, dark, and smells sour or like rotten eggs, the outlook is honest but grim: cut away everything rotten, and if only a stub of stem and one or two roots remain, treat it as a rescue cutting rather than a plant you expect to bounce back at full size.
If the stem itself is soft, black, or collapsing at the soil line, that plant is not coming back. Cut healthy stem sections above the damage and propagate those in water or moist perlite instead.
Knowing when to let go is part of doing this well, and prevention is what keeps you from facing that choice again.
How to Keep It From Happening Again
Drainage is non-negotiable. Every pot needs a real hole, and any decorative cover needs to be checked and emptied after watering, not left to collect water invisibly.
Amend your mix once and it keeps paying off for years: a chunky, well-draining blend forgives an accidental overwater in a way dense potting soil never will.
Check soil by feel, not by day count, and let satin pothos run drier than you’d expect for a “tropical” plant. It tolerates dry spells far better than wet feet.
Keep the checklist below and you’ll catch the next scare in about two minutes flat.
Diagnosis Checklist
- Lift the nursery pot out of any decorative cover, and check for standing water sitting in the bottom.
- Press a finger 2 inches into the soil, and note whether it feels wet, cool, or bone dry.
- Squeeze a handful of the mix, and check whether it balls up wet or falls apart loosely.
- Look at which leaves are affected first: lower and older leaves point to root rot, new leaf spotting points elsewhere.
- If the soil is wet and leaves are wilting anyway, stop watering and unpot the plant that same day.
- Inspect the roots: firm and white or tan means healthy, soft and brown or black with a sour smell means rot.
- Check the main stem at the soil line for softness or blackening, since that changes recovery from a repot to a rescue cutting.
- Trim every rotten root and any collapsed stem tissue back to clean, firm growth before repotting.
- Repot into fresh, amended, fast-draining mix in a pot with a drainage hole sized only slightly larger than the root ball.
- Hold off watering for 5 to 7 days after repotting to let cut roots callus before they take up water again.
Run through those ten checks and you’ll know within minutes whether you’re repotting a survivor or starting a new cutting.
Either way, you’re no longer guessing, and that’s what actually saves the next plant.