The method that actually works for aloe vera is dividing the offset pups that grow at the base of a mature plant, not cutting leaves like you would with echeveria or jade. Pull or slice a pup away from the mother plant once it has its own little cluster of roots, let the cut end dry for a day or two, then pot it in fast-draining cactus mix barely deep enough to hold it upright. That is the whole trick, and it works close to every time once you know what a ready pup looks like.
Most people who try to propagate aloe fail at one of two points. Either they cut a leaf off and wait weeks for roots that never come, because aloe leaves rot before they root, or they yank a pup too early and it has no roots to speak of, so it just sits there and sulks. There is also a timing sign almost everyone misreads, the moment a pup actually counts as ready, and a slow week in the middle of the process that makes new propagators panic and overwater right when the cutting needs to be left alone.
Stick with me through the steps and the timeline, and stay to the bottom for the saveable Aloe Vera at a Glance card, the kind of thing worth screenshotting before you walk back out to the plant.
Why Division Beats Every Other Method
Aloe vera does not propagate reliably from a single leaf cutting. This trips up people coming from other succulents, where a dropped leaf roots in a saucer of soil with zero effort.
Aloe leaves are different. They are mostly water-storing tissue with no growth node, so a cut leaf just slowly dehydrates and rots instead of forming roots or a new rosette. You can leave it on a windowsill for a month and get nothing but a shriveled husk.
What aloe does instead is send out offsets, called pups, from its base or roots. These pups are already tiny genetically identical plants, often with a start on their own root system before you ever touch them. Dividing them is not really propagation in the leaf-cutting sense, it is closer to transplanting a plant that already exists.
That is also why it works almost every time, if you wait for the right moment.
Step by Step: Taking and Rooting the Pup
Timing matters less by season and more by size here, since aloe is happy to pup any time it is actively growing, spring through early fall being the strongest window.
1. Find a pup that is actually ready
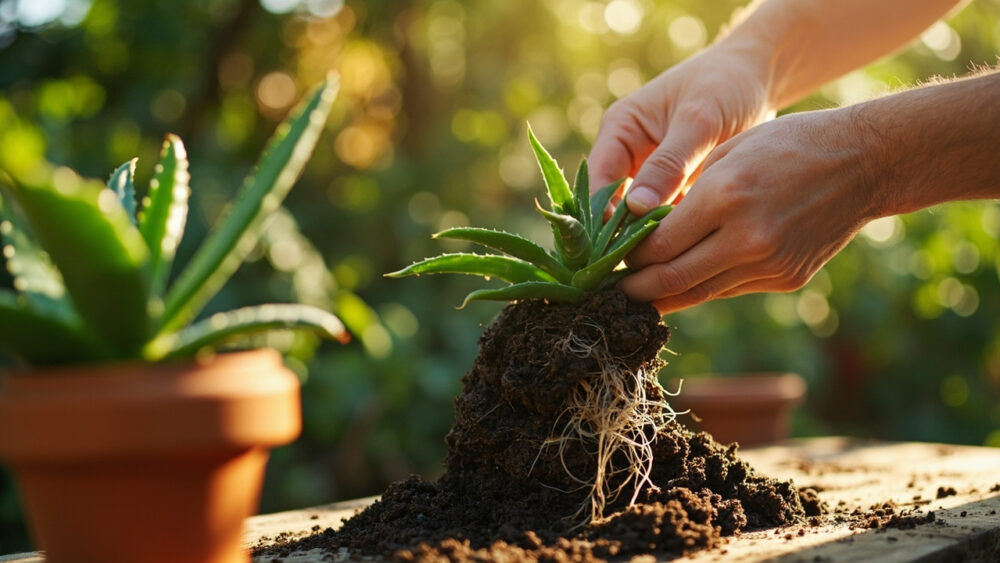
Look for a pup at least 2 to 4 inches tall with its own set of leaves that look like a small version of the mother plant’s, not just a nub. The guessable mistake is assuming bigger is always better and waiting for a huge pup. The real sign is roots, not size. Gently dig around the base with your fingers; a ready pup usually has its own thin white roots already reaching into the soil.
2. Separate it cleanly
If it already has roots, you can often tease it apart from the mother with your fingers alone. If it is still attached at the base with no visible roots, use a clean, sharp knife to cut it away, taking a little of the base tissue with it.
3. Let the wound callus over
Set the pup somewhere warm, dry, and out of direct sun for 1 to 3 days. This is not optional. Planting a fresh, wet cut straight into soil is one of the fastest ways to introduce rot before the plant has a chance.
4. Pot in the right mix
Use a cactus or succulent mix, or make your own with regular potting soil cut roughly half and half with coarse sand or perlite. Plant it just deep enough to stay upright, an inch or so of soil over any roots it already has, no deeper.
Getting the pup into soil is easy, keeping it alive the first two weeks is where most people slip.
Week by Week: What Actually Happens
Here is the honest timeline, because the silence in week one is what makes people overwater.
- Week 1: Nothing visible happens above soil. The pup may even look slightly deflated or dull. This is normal, it is establishing root contact, not dying.
- Weeks 2 to 3: New roots start anchoring into the mix. You will feel resistance if you tug gently on the base, a good sign you should stop tugging.
- Weeks 4 to 6: New leaf growth appears from the center, slightly brighter green than the older leaves. This is the real confirmation it took.
- Weeks 6 to 10: The plant is now growing like any young aloe and can be treated like an established one, including a normal watering schedule.
Once you see that fresh center growth, the hard part is over and it is really just a matter of when to size up the pot.
When and How to Pot Up or Plant Outdoors
Move a rooted pup into a slightly bigger pot once its roots fill the current one, usually 2 to 3 months in, or sooner if growth has clearly stalled. Go up only one pot size at a time, an inch or two in diameter, since aloe roots actually prefer being a little snug.
If you are in a warm enough climate to grow aloe outdoors year round, generally USDA zones 9 through 11, you can plant a rooted pup directly into well-draining garden soil or a raised bed once it has at least a month of solid root growth behind it and nighttime temperatures are staying above 40°F.
Everywhere colder, aloe vera stays a container plant that summers outside and comes in before the first frost. It has no frost tolerance worth counting on, a single hard freeze can kill it outright.
Either way, the soil and light rules do not change once it is out of the nursery stage.
Why Attempts Actually Fail
Almost every failed aloe propagation traces back to one of three things, and none of them is bad luck.
Overwatering the callused cutting tops the list. A freshly potted pup needs the soil to dry out almost completely between waterings, more like once every 10 to 14 days than a normal weekly routine, because there are barely any roots yet to take up water.
Skipping the callus step is the second big one, especially with knife-cut pups. A wet wound in damp soil is an open door for rot, and once the base turns soft and brown there is no saving it.
The third is light. New pups scorch fast in direct summer sun before their root system can support them, but they also stretch and go pale in low light. Bright, indirect light for the first month, then a gradual move into more direct sun, splits the difference.
Get those three right and there is genuinely very little that goes wrong with aloe.
Aloe Vera at a Glance
- Best method: divide rooted offset pups from the base, not leaf cuttings, which do not root.
- When to divide: spring through early fall, whenever the pup is 2 to 4 inches tall with visible roots of its own.
- Callus time: 1 to 3 days in a dry, warm spot out of direct sun before potting.
- Rooting mix: cactus or succulent soil, or potting soil cut half and half with coarse sand or perlite.
- Planting depth: just deep enough to stay upright, about 1 inch of soil over the roots.
- Watering while rooting: let soil dry out almost completely, roughly every 10 to 14 days, until new center growth appears at 4 to 6 weeks.
- Cold tolerance: none worth relying on, bring pots in before the first frost unless you are in USDA zone 9 or warmer.
The whole method comes down to patience with a pup that already has roots, not faith in a cut leaf that never will.
Get the callus and the watering right, and the plant does the rest of the work itself.