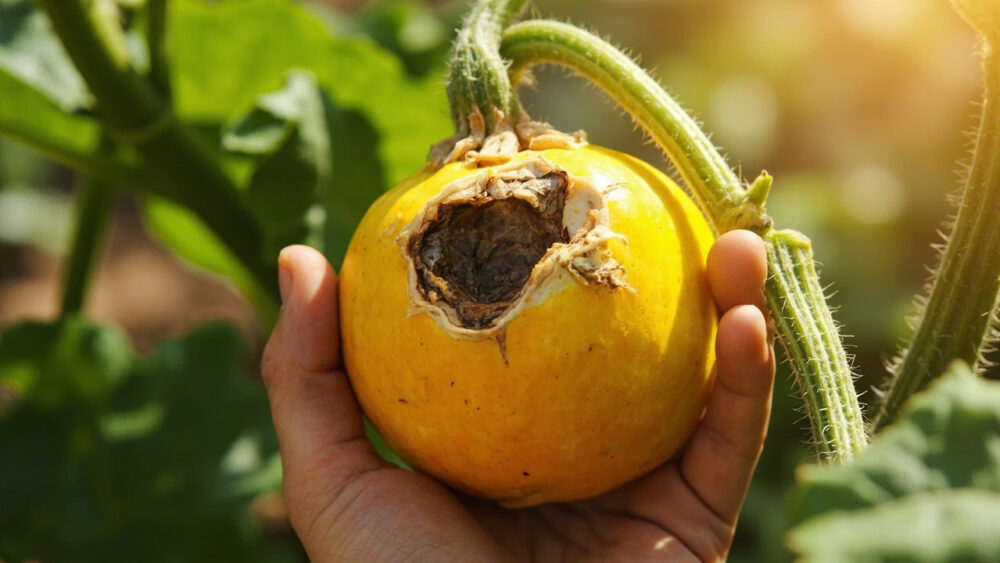
Squash blossom end rot almost always comes down to calcium not reaching the fruit, and that is nearly always a watering problem rather than a soil problem. The fix in most cases is not adding calcium at all, it is watering deeply and evenly so the plant can move the calcium already in your soil. Fix the water first, and the blackened, mushy blossom ends usually stop showing up on new fruit within a week or two.
Here is the part almost everyone gets wrong first: they assume the soil is calcium-deficient and dump in eggshells, lime, or a calcium spray. That rarely fixes it, and I will tell you why below.
There is one detail on the plant right now that tells you exactly which cause is yours, and the fix changes depending on it. Stick with me to the bottom, there is a two-minute diagnosis checklist you can run standing right at the plant, and it is worth saving before you touch anything.
Causes, Most to Least Likely
1. Inconsistent watering
This is the cause behind the vast majority of blossom end rot cases. Squash roots pull calcium up through water, and calcium only moves where water moves. If you water heavily then let the soil go bone dry for days, the fruit misses its calcium delivery during the critical early growth stage, even in soil that has plenty of calcium in it.
Confirm it: push a finger 2 inches into the soil near the base. If it is dry and crumbly some days and soggy after others, this is your cause.
Fix it: water deeply once or twice a week rather than a little every day, aiming for about 1 to 1.5 inches of water weekly, and mulch 2 to 3 inches deep to keep moisture even between waterings.
If your watering has been steady, the next cause is more likely.
2. Fast growth after a dry spell
A squash plant that got droughted for a week and then hit with heavy rain or a big watering session often pushes fruit faster than its roots can keep pace with calcium uptake. The damage shows up on the fruit that was expanding during that stress window.
Confirm it: check your weather memory. Was there a dry stretch of 5 or more days followed by a soaking rain or you catching up with the hose?
Fix it: you cannot undo the fruit already affected, but smoothing out watering from here on stops new fruit from repeating it.
New fruit sets constantly on squash, so the next batch tells you fast whether this is fixed.
3. Root damage from cultivating too close
Hoeing or tilling within a few inches of the stem tears the shallow feeder roots squash depends on for calcium and water uptake. The plant looks fine everywhere except the blossom ends of the fruit closest in age to when the roots got cut.
Confirm it: think back on recent weeding. Did you cultivate or dig within 6 inches of the main stem in the last week or two?
Fix it: stop cultivating that close, hand-pull weeds near the base instead, and let mulch do the weed suppression from now on.
If your soil hasn’t been disturbed, low calcium soil itself becomes worth checking, though it is rarer than people think.
4. Genuinely low soil calcium
True calcium-deficient soil exists, but it is far less common than watering problems, especially in soil that has ever been amended with compost or grown vegetables before. Very sandy soil or soil that has never been limed in a naturally acidic region is where this actually shows up.
Confirm it: a soil test is the only real confirmation. If you have never tested and your soil is sandy and drains fast, this moves up your suspect list.
Fix it: work in garden lime per the soil test recommendation, or add gypsum if your pH is already fine and you just need calcium without raising pH.
Excess nitrogen is the cause most people skip past, and it is worth a look before you blame calcium at all.
5. Too much nitrogen, too fast
Heavy nitrogen fertilizer pushes rapid leafy growth that outcompetes fruit for calcium, and it also drives fast watery fruit expansion that the calcium supply cannot keep up with. You will usually see dark, lush, almost oversized foliage alongside the rot.
Confirm it: check your feeding. Did you recently apply a high-nitrogen fertilizer or fresh manure?
Fix it: back off nitrogen, switch to a balanced or lower-nitrogen feed, and let growth slow to a normal pace.
Cold soil early in the season is the last common piece of this puzzle.
6. Cold soil early in the season
Roots take up calcium poorly when soil is cold, which is why blossom end rot shows up more on the very first fruits of the season and tapers off as summer soil warms. If you planted squash into soil still under 60°F, this is likely part of the story.
Confirm it: is this happening only on the earliest fruit, with later fruit looking normal?
Fix it: nothing to fix retroactively, but next season wait until soil hits 60 to 65°F before setting out transplants or direct sowing.
Now that you have your likely suspect, here is how to confirm it against the others.
How to Tell the Causes Apart
Where it starts matters. Blossom end rot always begins at the flower end of the fruit, the tip opposite the stem, as a small water-soaked spot that turns dark brown or black and sinks in. If the rot instead started at the stem end or shows up as spots scattered across the fruit skin, you are looking at a fungal or bacterial issue, not blossom end rot.
Old growth versus new fruit tells you about timing. Damage on only the earliest 1 or 2 fruits of the season points to cold soil. Damage that keeps recurring on new fruit points to ongoing watering inconsistency.
Look at the leaves too. Overly dark, lush, oversized leaves alongside the rot suggest too much nitrogen. Leaves that look fine everywhere point back to simple watering swings.
Once you know which one you have, the next question is what happens to the plant from here.
Will It Recover?
The plant itself is almost never in danger from blossom end rot, this is a fruit problem, not a plant disease. Affected fruit will not heal, so pick off and discard any fruit already showing the sunken black end, it is not going to ripen properly and it drains energy the plant could put into new fruit.
New fruit set after you fix the watering typically comes in clean within 1 to 2 weeks, since that is roughly how long a squash takes to size up from bloom to harvest.
If you are still seeing it on every new fruit after 3 weeks of consistent watering, suspect either the nitrogen or the genuine soil calcium causes and test your soil.
Cutting your losses only applies to individual fruit, never the whole plant, so keep watering on schedule and keep watching the next round.
How to Keep It From Happening Again
- Water deeply on a consistent schedule, roughly 1 to 1.5 inches per week, rather than shallow daily sips.
- Mulch 2 to 3 inches deep around the base to buffer soil moisture swings.
- Test your soil every couple of years so you know your actual calcium and pH status instead of guessing.
- Keep nitrogen fertilizer moderate and balanced, not heavy, especially once fruit starts setting.
- Avoid cultivating or hoeing within 6 inches of the main stem.
- Wait for soil to reach 60°F or warmer before planting squash out in spring.
With watering steady and soil warm, most gardeners see this disappear for the rest of the season.
Diagnosis Checklist
- Look at where the damage starts: if it is the blossom end opposite the stem, continue, if it is anywhere else, this is a different disease.
- Feel the soil 2 inches down right now: if it is dry and crumbly, inconsistent watering is likely, water deeply today.
- Recall the last 10 days of weather and watering: if you had a dry stretch followed by heavy rain or watering, mark fast growth after drought as a cause.
- Check for recent hoeing or digging within 6 inches of the stem: if yes, root damage is likely, stop cultivating that close.
- Check if only the earliest 1 or 2 fruits are affected: if yes, cold soil at planting time is likely, no fix needed now, adjust next season.
- Look at the leaves: if unusually dark, oversized, and lush, suspect excess nitrogen and cut back feeding.
- If none of the above fit and your soil is sandy or never tested, get a soil test for calcium and pH before adding any amendment.
- Remove any fruit already showing the sunken black end, it will not recover, and watch the next round of fruit after your fix.
Run this checklist once and you will know exactly which fix to make, no guessing required.
Most squash plants shake this off completely once the water schedule evens out.