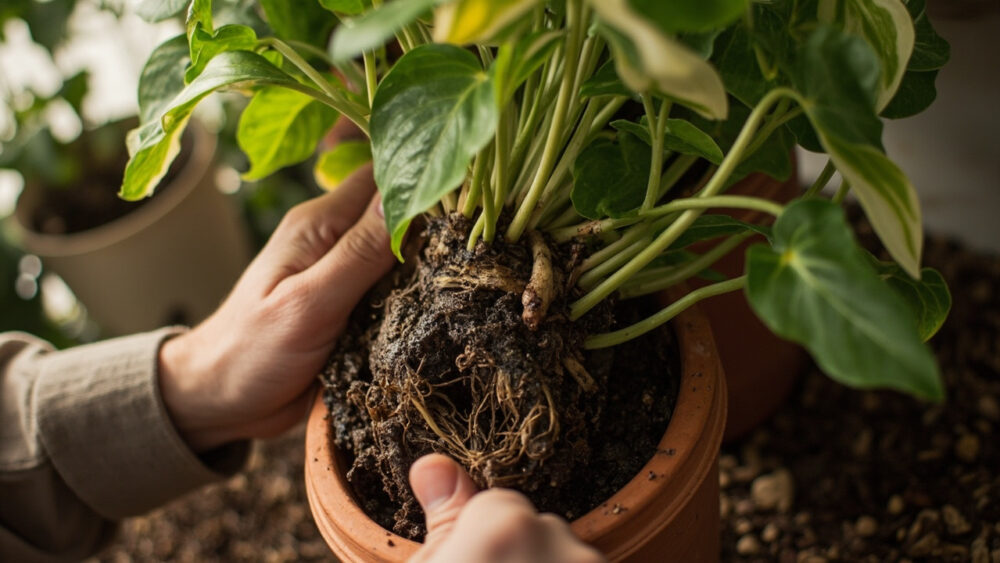
Pothos root rot almost always comes from soil that stays wet too long, usually because the pot has no drainage hole, the plant sits in a saucer of water, or the mix is dense potting soil that never dries. The fix is to pull the plant, cut away every mushy brown root, and repot into fresh, fast-draining mix in a pot that actually drains. Do that within the first day or two of noticing yellow, limp leaves and most pothos come back fine.
Everybody blames the water schedule first, and sometimes that is right, but plenty of rotted pothos got watered on a perfectly reasonable schedule and rotted anyway because the pot setup never let the water leave. The real tell is not how often you watered, it is what the roots feel like right now.
Stick around for the part most people skip: which leaf pattern belongs to which cause, an honest read on whether your plant is savable or a cutting-propagation project, and a two-minute diagnosis checklist at the very bottom you can run standing right next to the pot.
Most Likely Causes, Ranked
1. No drainage hole or a saucer full of standing water
Confirm it: lift the pot after watering and check the drainage hole, or lack of one. If there’s a saucer, look for standing water sitting there a day later.
This is the single biggest cause of pothos root rot, full stop. Water pools at the bottom, roots sit in it, oxygen disappears, and rot sets in within days.
Fix: repot into a container with a real drainage hole. If you love the decorative pot, keep the plant in a plastic nursery pot with drainage and drop that inside, then dump any water that collects underneath within the hour.
Drainage fixes the setup, but the soil itself is often just as guilty.
2. Dense, water-retentive potting mix
Confirm it: squeeze a handful of the soil. If it balls up like wet clay and stays that way, it is holding far more water than pothos roots want.
Straight bagged potting soil, especially once it is a year or two old and has broken down, compacts and holds water like a sponge. Roots near the bottom of the pot can be sitting in a swamp even when the surface looks dry.
Fix: repot into a mix cut with perlite, orchid bark, or coarse sand, roughly one part amendment to two or three parts potting soil. This lets excess water actually pass through instead of pooling around the roots.
Even good soil in a good pot fails if you water on autopilot instead of by feel.
3. Watering on a schedule instead of by feel
Confirm it: check the soil an inch or two down before every watering. If it’s still damp and you’re watering anyway “because it’s Sunday,” this is your cause.
Pothos wants to dry out noticeably between waterings, and how fast that happens changes with season, light, and pot size. A plant that dried out in five days in July might take twelve days in January.
Fix: water only when the top two inches of soil are dry to the touch, not on a fixed calendar. In low light or winter, that might mean once every two to three weeks.
Overwatering gets the blame, but a pot that’s too big for the plant sets the trap even when your watering habits are fine.
4. Oversized pot for the current root system
Confirm it: compare the root mass to the pot size. If roots only fill the bottom third and the rest is bare soil, the pot is too big.
A big volume of soil around a small root ball holds moisture far longer than the roots can use it, and that excess sits there rotting the roots that do exist.
Fix: size down. Pothos actually prefers being slightly snug, a pot roughly 1 to 2 inches wider in diameter than the root ball, not a pot sized for the plant it might become in two years.
Sometimes the problem isn’t the pot or the water at all, it’s what’s living in that wet soil.
5. Fungal pathogens in already-wet soil
Confirm it: pull the plant and smell the roots. A sour, swampy, rotten-egg smell along with black, mushy roots that slide their outer layer off when you pinch them points to fungal rot on top of the overwatering.
Pathogens like Pythium and Phytophthora thrive in waterlogged, low-oxygen soil. They don’t cause the original problem, they move in once conditions are already bad and finish the job faster.
Fix: this requires a full repot, not a patch job. Cut away all affected roots with clean scissors, let the remaining healthy roots air-dry for an hour, and repot into fresh sterile mix. A fresh pot, not the same one, is safer if the old one hasn’t been scrubbed and dried thoroughly.
Once you know which cause fits, the next question is how to tell it apart from the others by just looking at the leaves.
How to Tell the Causes Apart
Where the yellowing starts is your best clue. Root rot from standing water or dense soil tends to hit lower, older leaves first, they turn yellow, then brown and mushy, and the stem near the soil line often feels soft.
Nutrient or light issues, by contrast, usually show up as pale new growth or slow, uniform fading across the whole plant, not soft brown mush at the base.
Pattern matters too. Rot from a bad pot setup or oversized container tends to be uniform, the whole root ball is affected because the whole pot stayed wet. Rot from inconsistent watering is often patchy, some roots fine, some rotted, depending on where water pooled.
If the leaves are wilting despite wet soil, that’s the giveaway everyone misreads.
Wilting looks like thirst, so people water more, which is exactly backwards, since wilting with wet soil means the roots are too damaged to move water at all.
Once you’ve matched the pattern to a cause, the honest next question is whether the plant is actually going to make it.
Will It Recover?
Caught early, with firm white or tan roots still outnumbering the mushy brown ones, pothos recovers well after a repot into fresh, well-draining soil. Expect the plant to sit still or even drop a leaf or two for one to two weeks while new roots form, then resume growth.
If more than half the root system is black, mushy, and foul-smelling, the outlook is worse. You can still save the plant, but not by nursing the existing roots.
Cut your losses on the root ball and take healthy stem cuttings just above a node instead. Root them in water or moist perlite, and you’ll have a new plant in three to four weeks, often faster than waiting on a badly damaged root system to rebuild.
If the main stem itself is soft, dark, and collapsing rather than just the roots, there is usually nothing left to save, and cuttings from healthy upper growth are your realistic path forward.
Recovery is possible in most cases, but only if you stop the cause instead of just repotting and repeating the mistake.
How to Keep It From Happening Again
Drainage is non-negotiable. Every pot needs a hole, and every saucer needs to be emptied within an hour of water draining into it.
Check soil by feel, not by calendar, using a finger stuck two inches down or a wooden chopstick pulled out to check moisture along its length.
Use a mix built for aroids: potting soil cut generously with perlite or bark so water passes through in seconds, not minutes.
Match the pot to the roots, sizing up only when roots are visibly circling the bottom or poking through the drainage hole.
Get all of that right once and root rot becomes a rare event instead of a recurring one, which brings us to the fast version you can run right now.
Diagnosis Checklist
- Check for a drainage hole and standing water in the saucer, if there’s no hole or water has sat there over a day, that’s likely cause number one.
- Squeeze a bit of the soil, if it balls up wet and dense rather than crumbling, the mix itself is holding too much water.
- Press a finger two inches into the soil, if it’s still damp days after your last watering, your schedule is outpacing the plant’s actual needs.
- Pull the plant gently and look at root coverage versus pot size, sparse roots in a mostly bare, oversized pot point to a pot that’s too big.
- Smell the roots, a sour or rotten-egg odor with black, sliding root tissue means fungal rot is active and a full repot is required.
- Note where yellowing started, lower and older leaves first with a soft stem base means root rot, uniform pale new growth points elsewhere.
- Count healthy white or tan roots versus mushy brown ones, more healthy than damaged means repot and recover, more damaged than healthy means take stem cuttings instead.
Run through those seven checks and you’ll know exactly what you’re dealing with before you even reach for the scissors.
Fix the setup, not just the symptom, and this is a problem your pothos only has to teach you once.