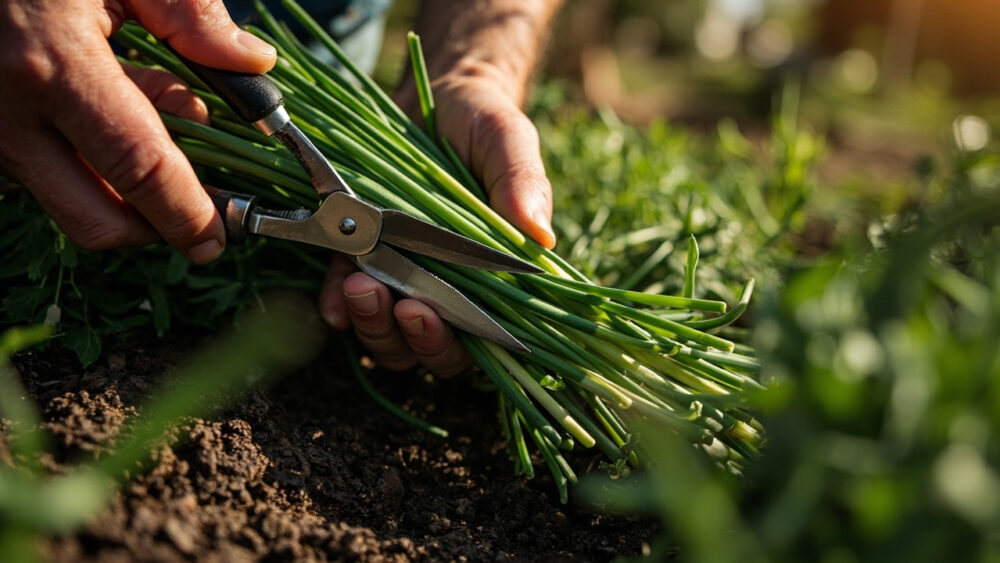
Harvest chives once the leaves reach about 6 inches tall, snipping with clean scissors down to 1 to 2 inches above the soil rather than pulling individual blades. That is the whole mechanical answer to how to harvest chives, and once you know it, you can start cutting today if your plant is tall enough. But the details around that basic move are what decide whether your chive patch keeps producing for years or peters out by midsummer.
Most people make the same mistake with chives: they snip a few leaves here and there from the outside of the clump, the way you would pick individual parsley stems. That looks tidy but it is exactly backward, and it is the single habit that stunts a chive plant faster than anything else.
There is also a flowering question nobody warns you about until the blooms show up and you are not sure whether to cut them off or eat them, and a curing question that trips up people who grow chives for the first time and expect them to dry like oregano. Both get answered below, along with the Chives at a Glance card at the bottom of this page, worth saving before you head out to the garden.
The Real Readiness Signs
Height is the main signal. A new chive planting, whether from seed, division, or a nursery pot, needs to establish a real root system before it can handle cutting. Give it 60 days from transplant, or wait until the grass-like blades reach at least 6 inches, whichever comes later.
Established clumps, meaning anything in its second season or beyond, are ready anytime the leaves hit 6 inches after a flush of new growth. Color matters too. You want deep, uniform green, not the pale yellow-green of a plant that is stressed or nitrogen-starved.
If the clump looks thin, with only a handful of thin shoots instead of a dense tuft, hold off. Thin growth means the plant needs another few weeks of unbothered growing before it can spare any leaves at all.
Once you can eyeball that density, the next question is when in the season to start.
The Timing Window, and What Guessing Wrong Costs You
Chives are perennial and cold-hardy, generally to USDA zone 3, and they green up early, often within a couple weeks of your last hard frost once soil temperatures climb past about 40°F. That early flush is harvestable, but resist cutting the very first growth of the season down to nothing. Let that first round reach 6 inches and take only the top half.
If you assumed later is always safer, that guess costs you the best flavor window. Chives get slightly tougher and more onion-sharp once they flower, usually in late spring to early summer depending on your climate. Harvest right before or during early bud formation for the mildest, most tender leaves.
Go too early, meaning before that 6-inch mark on new growth, and you weaken a plant that has not built enough root reserve yet. Go too late in the season, into fall after growth has slowed and cooled, and you are cutting leaves the plant needs to photosynthesize and store energy for winter dormancy.
Knowing when in the season to cut only matters if you also know how, and that is where most people lose plants.
How to Cut Without Wrecking the Clump
Cut whole leaves, not tips, and cut from the outside edge inward in a rotation, never all from one side. Use sharp scissors or garden snips, not a dull kitchen knife that crushes the hollow stems and invites rot at the cut end.
Take an entire handful of leaves at once, gathering them like a ponytail in one hand, and cut straight across about 1 to 2 inches above the soil line. This is the opposite of tip-pinching, and it is why chives tolerate hard harvesting better than almost any other herb.
Never take more than a third of the total clump in one cutting. A dense established patch can often handle a full haircut down to 2 inches every 3 to 4 weeks through the growing season, but a smaller or younger clump should get lighter, more frequent trims instead.
- Right tool: sharp scissors or garden snips, wiped clean between plants if you are working several clumps.
- Right cut height: 1 to 2 inches above soil, never at the base and never below the soil line.
- Right amount: up to one third of the clump per cutting, rotated around the plant.
What you do in the five minutes after that cut matters almost as much as the cut itself.
The Flower Question
Chive blossoms, those round purple pom-poms, are edible and mild-flavored, and cutting them off does redirect energy back into leaf production if that is your priority. But if you want the flowers for salads or vinegar, let a few stalks bloom and just keep harvesting leaves from elsewhere in the clump. You do not have to choose one or the other for the whole plant.
Either way, once flowering stalks turn tough and fibrous past bloom, cut them out at the base so the plant does not waste effort on seed production.
That cleanup habit sets up the next flush better than almost anything else you can do.
Right After the Cut
Rinse the harvested leaves in cool water and shake or pat them dry. Wet chives left in a bag turn slimy within a day, so dry them well if you are not using them immediately.
Use fresh chives within a few days for the best flavor, since their aromatic oils fade fast once cut, faster than most herbs you are used to handling. Store them upright in a glass of water like cut flowers, loosely covered with a produce bag, in the refrigerator, or wrap them dry in a paper towel inside a sealed container.
Back at the plant, water lightly if the soil an inch down feels dry, and skip any high-nitrogen feeding right after a heavy cut. A light dose of balanced fertilizer every 4 to 6 weeks during the growing season is plenty for chives, which are not heavy feeders.
Getting the harvest home safely is only half the job, keeping the plant productive for the next round is the other half.
Keeping the Harvest Coming
If you assumed cutting hurts the plant, that is the guess that keeps people too timid to harvest at all. Chives actually respond to regular cutting with fuller, denser regrowth, much like a lawn. The real risk is not cutting too much at once, it is never cutting at all, which leads to a woody, floppy clump that flowers itself out and produces thinner leaves every year.
Divide an established clump every 3 to 4 years, in spring or fall, once the center starts thinning or dying out. This is less about harvesting and more about long-term vigor, but it directly affects how much you will have to cut going forward.
For preserving a big harvest, chives do not dry well by the hang-and-air method the way rosemary or oregano do. They lose most of their flavor and turn to green dust with little aroma. Freezing works far better: chop fresh, spread on a tray to freeze individually, then transfer to a bag or container. Frozen chopped chives hold flavor for several months and go straight into cooking without thawing.
That storage note is worth remembering, but the fastest thing to remember is everything below.
Chives at a Glance
- When to start harvesting: once new growth reaches about 6 inches tall, and at least 60 days after transplanting a new planting.
- Best flavor window: right before or during early flower bud formation, before blooms fully open and leaves turn sharper.
- How to cut: gather a handful of leaves and snip straight across 1 to 2 inches above the soil, never below it.
- How much to take: up to one third of the clump per cutting, rotating around the plant on successive harvests.
- Cutting frequency: every 3 to 4 weeks for established clumps during active growth.
- After harvest: rinse, dry well, and use within a few days, or freeze chopped chives for longer storage since air-drying kills the flavor.
- Long-term care: divide clumps every 3 to 4 years and cut spent flower stalks at the base to keep production high.
Cut chives like you mean it, a full handful at a time, and the plant rewards you with more.
Treat it timidly, snipping a few tips here and there, and you will wonder years from now why the clump never got any bigger.